Search This Blog

Wednesday, October 25, 2023

Reindeer Riding Sticks

Remember Stick Horses? I've taken the general concept of a Stick Horse and applied it to my 
Reindeer Riding Sticks


Supplies:

pool noodle (from Dollar Tree)
brown knee high sock (found mine in Men's section at Walmart)
tacky glue
2" red pompom
duct tape
ribbon
1 1/2" google eyes
hat or yarn for hair (I used hats from snowmen ornaments from dollar tree)
hot glue
foam sheet (Michaels)
brown felt (Michaels)
embellishments (optional)


Add tacky glue to end of pool noodle. cover that end with the sock. press toe of sock down on the glue so that it doesn't move around. Pull sock down over noodle. Bend noodle at the heal of the sock. Duct tape the shape in place where the ribbon will go.

Cut out antlers from foam sheet and two triangular pieces for ears out of the felt. Going forward, everything from this point will be hot glued. Glue ribbon over the duct tape, don't worry if a part of tape is exposed on the inside and sticky. It's fine. hot glue nose and hat in place. slide the antlers through the folded head section (you may have to wiggle them through if the space ended up being too tight). Glue to the long port of the noodle. Glue on hat or yarn for hair.

How to make the ears: you'll glue the bottom corners of the triangular ears together.


Decide if you want the ears on top of hat or underneath sticking out sideways. If your antlers seem to be leaning forward, then glue the ears under the hat so that they are sideways to hold the antlers back. Then glue both sides of the bottom of the ear in position. Glue embellishments to ribbon if you want this. Then peal sticker off the back of the google eyes and hot glue the eyes down. I did eyes last so that glue strings wouldn't get on them and mess them up.

Sunday, October 1, 2023

Halloween Card 2023: Falling Witch

 HALLOWEEN 2023!

"Falling Witch"


There are about six different backgrounds used from Whimsy Stamps's "Haunted Graveyard" Paper. The ghost is from Gerda Steiner Designs "Ghosts" collection. I knew I wanted to use the witch falling off her broomstick die cut. I was flipping through some card images for inspiration when I came across the ghosts. I thought it was a perfect match of the ghost scaring the witch. I used vellum for the ghost. Strangely, I glued around the edge of the ghost and for some reason, this made the edges of the ghost appear see-through. I thought it would go away once dry so I kept it as is. Guess what!. It remained clear. UGH. Wish I had known, I would have covered the backs of all the ghosts with glue to make them appear more clear. I always learn something new each time I make a card.


Birthday Cards 2023 (favorites)


Birthdays! 
We all have them. 
I love to celebrate everyone with a special card. 

Here are some of my favorites from 2023. 

This is one of my absolute favorites. The stamp of Fester is from C.C. Designs "The Family" set. It was this very set/card that popped up on Facebook that first introduced me to C.C. Designs. I fell in love with the card and just had to replicate it! It is such a hoot to sent to folks. I plan to make tons mor of these for the future. In fact, I used a poster board and sprayed it from top to bottom with the Tim Holtz shimmer greens so that I can cut the poster board down to card sizes and then add fester to them. 


This next two  cards were part of a special order. 
I had ordered a reclining chair to be delivered a put together. Of course, the chair was for my craft room. The delivery person was blown away with my craft room. Even though he is beginning to make cards himself, he special ordered a couple of cards for me. The first was for his son turning 21 who likes to fish. It was a little harder for me to think outside of my cutesy "tackle-box" so to speak, but I think this turned out great. He was blown away with it. (Fish paper is from the Craft Constortium's "The Riverbank" collection). 


The second card for this gentleman was for his wife. She's a florist. That's all I had to go on. So, I made a potted plant of flowers for her. Originally, I cut the pot to be slimmer but thought it was too thin. I wish I had kept it instead of the version I used. I'll know that for the next time. This card brought the man to tears. The card actually stands up. 


On another page of this blog is a set of cards I did as a guest designer for Gerda Steiner Designs. I designed three cards for them. My absolute favorite (and simplest) of them all was this little mouse making a wish. Such an easy card to make. I have a star die cut that makes the swirl of stars. I just glued glitter paper from the Dollar Tree behind the flap of the card. Best of all, I can customize this card with different colored stars. 


Thursday, August 17, 2023

Craft Consortium Paper

Craft Consortium has some of the best paper for crafters. The designs are amazing and the paper is the best quality I have found. I hate to even use it because then I will be out of it. Here are items I've made with their paper. Pictures just don't do them justice!


Tuesday, May 2, 2023

Sneak Peak 3: Cupcake Mice Stamp Set by Gerda Steiner Design


Hi, it’s Mimi. I’m so excited to share this birthday mouse making a wish from the Cupcake Mice set from Gerda Steiner Designs. 

"Wish"

Super easy card to make. Used Recollections 5”x7” blank white card for the base. Stamped the mouse and cupcake onto the card using Memento Tuxedo Black ink. Used a star swirling die on the card as though his wish is swirling out into the universe. Used Bearly Art glue to glue a piece of purple glitter paper on the inside of the card to act as the background of the stars. Stamped the Happy Birthday and make a wish stamps onto the card using Memento Grape Jelly ink. Glued on a few extra shiny confetti stars with Bearly Art glue. Colored the mouse and cupcake with my Ohuhu alcohol markers.

Easy Peasy.

May all your wishes come true. 


Sneak Peak 2: Cupcake Mice Stamp Set by Gerda Steiner Design

Hi, it’s Mimi. I’m so excited to share this adorable mouse enjoying his cupcake from the Bakery. The mouse is from the Cupcake Mice set from Gerda Steiner Designs.


"Bakery"

Naturally, after making the Cupcake Tower card, it was only fitting to make a bakery card. 

The card base is a plain white Recollections 5”x7” card base. Started with a background (the wallpaper) with a soft green design from the Parklane Celebrate paper pad. Glued it down with Bearly Art glue. Picked a piece of blue paper from the Craft Consortium Ocean Tale Premium cardstock. Wet it and then embossed it with Darice Brick embossing folder. Then cut the pieces so that I had 2 – 1” strips used for the columns and a 2” strip for the bottom wall. Used double-sided foam to attach to the card.

Used a polka dot piece of paper from the Recollections Confetti paper pad as the awning. Curled the bottom of the awning by rolling it around one of my Ohuhu alcohol markers since they were the right size. Attached the awning with double-sided foam tape. Stamped the banner ribbon from Gerda Steiner Designs’ Nutcracker set onto Park Lane 110# cardstock using Memento Teal Zeal. Stamped “Make a Wish” from the Cupcake Mice set using Memento Tuxedo Black in. Fussy cut the sign and attached with double-sided foam tape.

Stamped the mouse from the Cupcake Mice set and the cupcake stand (unknown stamp set) onto Park Lane 110# cardstock using Memento Tuxedo Black ink. Colored the images with my Ohuhu alcohol markers. Glued them in to the scene with Bearly Art glue.

Added a small piece of cellophane as a window and tucked it in under all the “building pieces” and added Bearly Art glue in the spaces. Used Stampin’ Up cupcake paper punch on the white Park Lane 110# cardstock to create the window art. Glued it into place with the Bearly Art glue as well. Lastly, added clay confetti embellishments to the card.

Just seeing how happy this guy is with his cupcake makes me want a cupcake.


Sneak Peak 1: Cupcake Mice Stamp Set by Gerda Steiner Designs


Hi, it’s Mimi. I’m so excited to share this adorable mouse with his tower of cupcakes from the Cupcake Mice set from Gerda Steiner Designs.


"Cupcake Tower"

As soon as I saw the mouse with his stack of cupcakes, I knew he needed his own cupcake tower. Pulled out a piece of white Park Lane 110# cardstock for the white background of the card – used it for both the mouse and the “29 Again?” pieces. Taped a piece of paper towel over the bottom of the mouse and inked him with Memento Tuxedo Black ink. Removed the paper towel so that I didn’t get the bottom portion of his body in the image. Used the single cupcake from the set and stamped the cupcakes next to each other in a variety of directions to create the tower as well as the cupcake falling off to the side using the same Memento Tuxedo Black ink. Colored the design with my Ohuhu alcohol markers. Used a die to cut the image.

Was thinking of the background and decided to go with soft colors. A friend of mine loves the color, so I found a piece of orange paper with sprinkles from the Parklane Celebrate paper pad and used the next size die to cut out the same shape as the mouse image.

Matched a polka dot piece of paper from Recollections Confetti paper pad to the orange paper. Used a cloud die cut to cut the right edge. Accompanied it with a water color printed paper. I wet the water color printed paper and used the Paper Studio cupcake embossing folder to emboss the cupcakes on to the paper.

Used Bearly Art glue to glue the water color, polka dot, and orange papers onto a blank Recollections 5”x7” card base. Used double sided foam tape under the mouse and the “29 again?” pieces to make them pop just a little bit. Punched out the “29 Again?” piece using a scalloped oval paper punch. Stamped with the “29 Again?”. Went around the edge with one of my Ohuhu markers. Added a few clay confetti embellishments at the end.

It kind of looks like the mouse was startled when he realized the birthday person was claiming to be 29 again. HAHA. He totally has a special place in my heart.

Happy crafting.


Monday, May 1, 2023

Winner: craft challenge - Receipt Taper rethink/reuse hosted by ACR


From this 

To This

When the Challenge is to rethink/reuse Receipt Tape rolls you make an old fashioned movie box. Used a small box container that was white with no lid, but the perfect depth for a roll of receipt tape. Covered the box with fun scrapbook paper. made a lit in a complimentary color of scrapbook paper. Cut out the center (the "viewing screen") added gold elements around the opening like stage curtains (actually, the gold is pieces from a candy box). Found old comics to paste on the receipt tape to create a "movie". Poked set of holes at top and bottom of box. Since the movie sat so far down in the box due to the positioning of the receipt tape, glued popsicle sticks at top and bottom of the "viewing screen". Inserted pencil in bottom holes through the receipt tape. Threaded the movie under the popsicle sticks. Inserted top pencil into the holes and taped the top part of the movie to the pencil. If you turn both pencils away from you, it moves the movie up. If you move both pencils towards you, it moves the movie down. The movie can grow by adding more comic, stamped pictures, drawings, etc. Final touched, hot glued some lollipop cabochons as decorative pieces. 


Friday, April 28, 2023

Top 6 Favorite Card Making Supplies (not sponsored)

 We all have our favorite "go to" supplies for crafting and creating. Thought I would share a few of mine. 

1) Cards/Envelopes 


I love using Recollections cards (and envelopes) for my card bases.

They are a good weight for holding glue, embellishments, layers of paper. It just works. They come in a couple of different sizes. I use the 5"x6.5" and the 4"x5.5" sizes. I love them so much that I bought them in bulk at one point and am still using the supply. 

2) Ink Pads


Memento dye inks. 

I watched several videos of people comparing just about every ink pad out there. Lucky for me, Austin Creative Reuse has a ink pads donated to them. I was able to purchase several of the highly recommenced inks from the videos for next to nothing cost. I was able to test them out before making a huge investment. I decided I like the Memento the best. I then bought every color of the normal sized pads (not the minis). It doesn't bleed when using alcohol markers to color in the designs. I'll pass on this little tip: pigment ink vs dye ink...Pigment ink is designed to move around where as dye ink is designed to "dye" on the spot without moving around. Pigment is best used when you want to push the ink around similar to water colors. 

3) Glue! 

You would think they are pretty much the same. Not so. I used to love using Mod Podge glue for all my paper crafting. One day, I was buying items on a crafty supply website. I was about $10 short of free shipping. So, it was either put another item in my cart or pay $10 in shipping. I started looking around for something that was around $10 since I was going to have to spend it one way or another. I bought the smallest bottle of Bearly Art glue that I could find. 

I had heard over and over how good this glue was. Might as well try it out. WOW! Totally awesome glue! It's super thin not thick like Mod Podge and super strong! I love using it on my cards because it doesn't really squish out from under the paper when I press the paper down on my cards. It doesn't leave bumps/streaks behind the paper. I've used it on my crafts as well...If you looked at the pirate ship that I made (see sidebar for picture), you will notice the cannons. Those are beads glued onto the pirate ship (of course this glue was used in several spots on the ships, but I like pointing that out because they aren't on a flat horizontal surface). This glue costs a bit more but is truly worth it. Plus, you don't need a lot since the glue is such high quality. Tip: I have the smallest bottle with a bigger bottle for refilling. I keep the small needle sized nozzle on the my bottle with a straight pin in the nozzle so it doesn't dry out and so that I don't have to keep removing the lid and putting the nozzle on. It just sits on my craft table to grab at any moment. I did put a wrist pin cushion around the lamp neck so that I can stick the straight pin in it when I'm working with the glue. This way, I don't loose the pin, nor poke myself with it. 

4) Alcohol Markers

Ohuhu Markers - Specifically Honolulu B set

I tried Copic along with a couple of other brands in the store and decided the brushes were way too stiff. I ordered a set off of Amazon, didn't like it either and returned it. Then I purchased the Ohuhu Markers. Homerun! I actually purchased their "Honolulu" set in pastel colors originally. Loved them immediately. I eventually decided to purchase a set that had a thin tip on one side with the brush on the other side. When I originally purchased I didn't realize this was an option. I purchased the Honolulu B set and have everything I need for coloring. Yes, I still have the other set because I couldn't part with them.

5) Glitter Gel Pens

Gel pens are the same...they skip, run out of ink super easy, you have to shake them to get the ink to write, the ink leaks etc. Wrong. Another card maker mentioned she loved using Soucolor Glitter Gel pens on her cards. This is another of those things I was a nonbeliever about. But, Amazon had them at a reasonable price with the option to return. OMG, they are fantastic! No skipping, no running out of ink, no having to shake them to get the ink to write, no leaking, nothing. They are NICE! They are fantastic at coloring and are super glittery. The ink dries fast so that they don't make a mess.


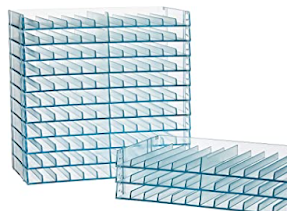
6) Marker Storage


I don't know about you, but I like to have my markers in number order. Whenever I am planning to color something, I pull out the color swatch to see what colors I want to use. Since I have them in number order, I can find the ones I want easily every time. This is why I love Crafter's Companion Marker Storage. We have several of these trays. All my alcohol markers are housed in them as well as all the paint pens house in the "paint" zone of the craft room. I would check out Facebook Marketplace to see if you can find them at a lesser price, but if you can't, Amazon has them. They are still every bit worth the money and will last forever. 


Card Maker Advice for Beginners


When I first started out, I purchased a few cardmaking kits from "Annie's Cardmaker Kit of the month" (not sponsored), but you can purchase card making kits from a number of sites. They provided all the materials needed such as paper, ink pad(s), stamps, instructions, etc. I was able to learn a few techniques that I didn’t even know existed. Once you've made a few cards and have the basics down, it's time to branch out.


Next, you need to figure out what your preferred aesthetic is. Is it funny, is it nature related, bold in color, soft in color, cartoony, etc. For me, I like cute-cartoony/kawaii stuff. Once you figure out the aesthetic you like, you can then search various websites that have images of cards made for inspiration. A good way to search for cards in your aesthetic is to go onto Pinterest (not sponsored) to look for card images. As you click/save each image that you like, you will create not only a file of inspiration, but, also, learn of the companies that created the stamps you like for purchasing down the road. 

When it comes to materials, experiment. I bought a couple of stamp pads of various brands as well as alcohol markers and tried them out first prior to buying all the colors offered by that brand. I was able to return items that I didn’t like. Once I found the materials that I liked, I then bought more supplies from that product line. By doing this, I wasn’t stuck with a bunch of supplies that I wasn’t going to use. 

Shortly after I started making cards, I found out that the layouts for cards are called "sketches'. So, go to Pinterest and type in card sketches. You will see various layering ideas for making cards. 

One extra piece of information that everyone forgets to mention is that "Square cards" are considered odd shaped and cost more to mail. You will never see me make a Square card because of this. If you see me make one, it's because I will be delivering it in person. 

Hope this helps. Good Luck.

#AnniesCardmakerKit #cardmaking


Friday, March 31, 2023

Winner: Craft Challenge - Tape Dispenser Rethink/reuse


One of my favorite things to do is participate in craft challenges. Our local craft recycle place, Austin Creative Reuse (ACR) (not sponsored) hosts a craft challenge each month. Usually, the item they choose is something they have an abundance of, but not always. This challenge was to rethink an ordinary tape dispenser. 

The natural shape of the tape dispenser is similar to a ship (at least in my mind it is). So, I set off on this adventure to create a ship or two or three. I actually wanted to make more, but decided three was enough. 

I stole my husband's tape dispense as it was a different shape than all the other dispensers. His was to become the Viking ship. 


Here's how I transformed the tape dispenser into a Viking ship. The eagle is a piece of a trophy. I repainted it along with the tape dispenser to look like wood. Took a couple of wine corks, cute them down to size, used paint marker and embellishments to make them look like shields. The sail is a paper towel and washi tape. I wanted the sail to be flexible as if it was being blown by the wind. Wooden dowel used for the mast and added oars. 


Next, was the Pirate Ship. Painted the dispenser to give it some depth. Glued on beads to be the cannons and used paint marker to add the white to them. This is where I discovered how good "Bearly Art Glue" really is. I was skeptical that the beads would stay on, but WOW, they stayed and didn't slide or anything. Totally my new favorite glue!! The ladder was a mini picket fence - cut it down to size and cut the pointed tops off. Then painted. 

Yes, you guessed it, the sails are face masks that I repainted and embellished. Another wooden dowel for the mast. Saucy take-out container for the "Crows Nest". My Granddaughter said it needed slime/seaweed on it to bring character to it. Spritzed on shimmer spray. Made my own seaweed by painting on an acrylic board. Once dried, ran it under water and scraped it into yucky mess. Added that to the ladder. 


Can't have a pirate ship without a treasure chest. Painted a small bead holder and filled with small beads to look like treasure. Tore and rolled up a small piece of paper and place in the bottle. 


Finally, The Chinese junk ship was created. Painted the "wood" onto the brown tape dispenser with a thin paint pen. Painted the scrapbook paper used for the sails. Wooden dowel and bamboo sticks (and bamboo pieces) used on/in/or supporting the sails. Strung a variety of beads together to hang off the ship. 

These were a lot of fun to make. My husband says I can now be called Admiral since I have a fleet of ships. 

Happy adventuring, 
Admiral Mimi signing off.....

#AustinCreativeReuse